Typical Steps for Drug Repurposing
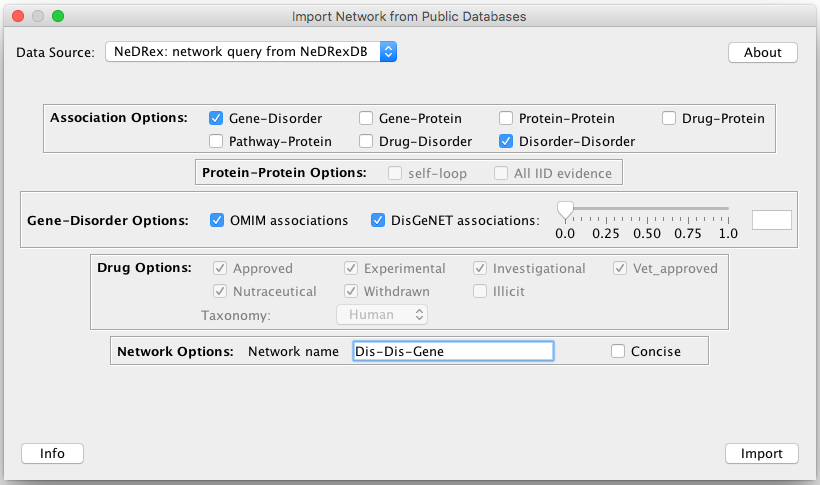
Import the required network from NeDRexDB
To start with disease module identification or drug repurposing with our tool, first you need to import the network containing
Disorder-Disorder and Gene-Disorder association types from NeDRexDB. This is possible by going to File –> Import
–> Network from Public Databases....
See the Import Network from Public Databases section for a thorough explanation of this step.
NeDRexApp workflow
A typical NeDRexApp workflow has the following three steps to identify disease modules and drug repurposing candidates. You can find a more thorough explanation of the individual steps below:
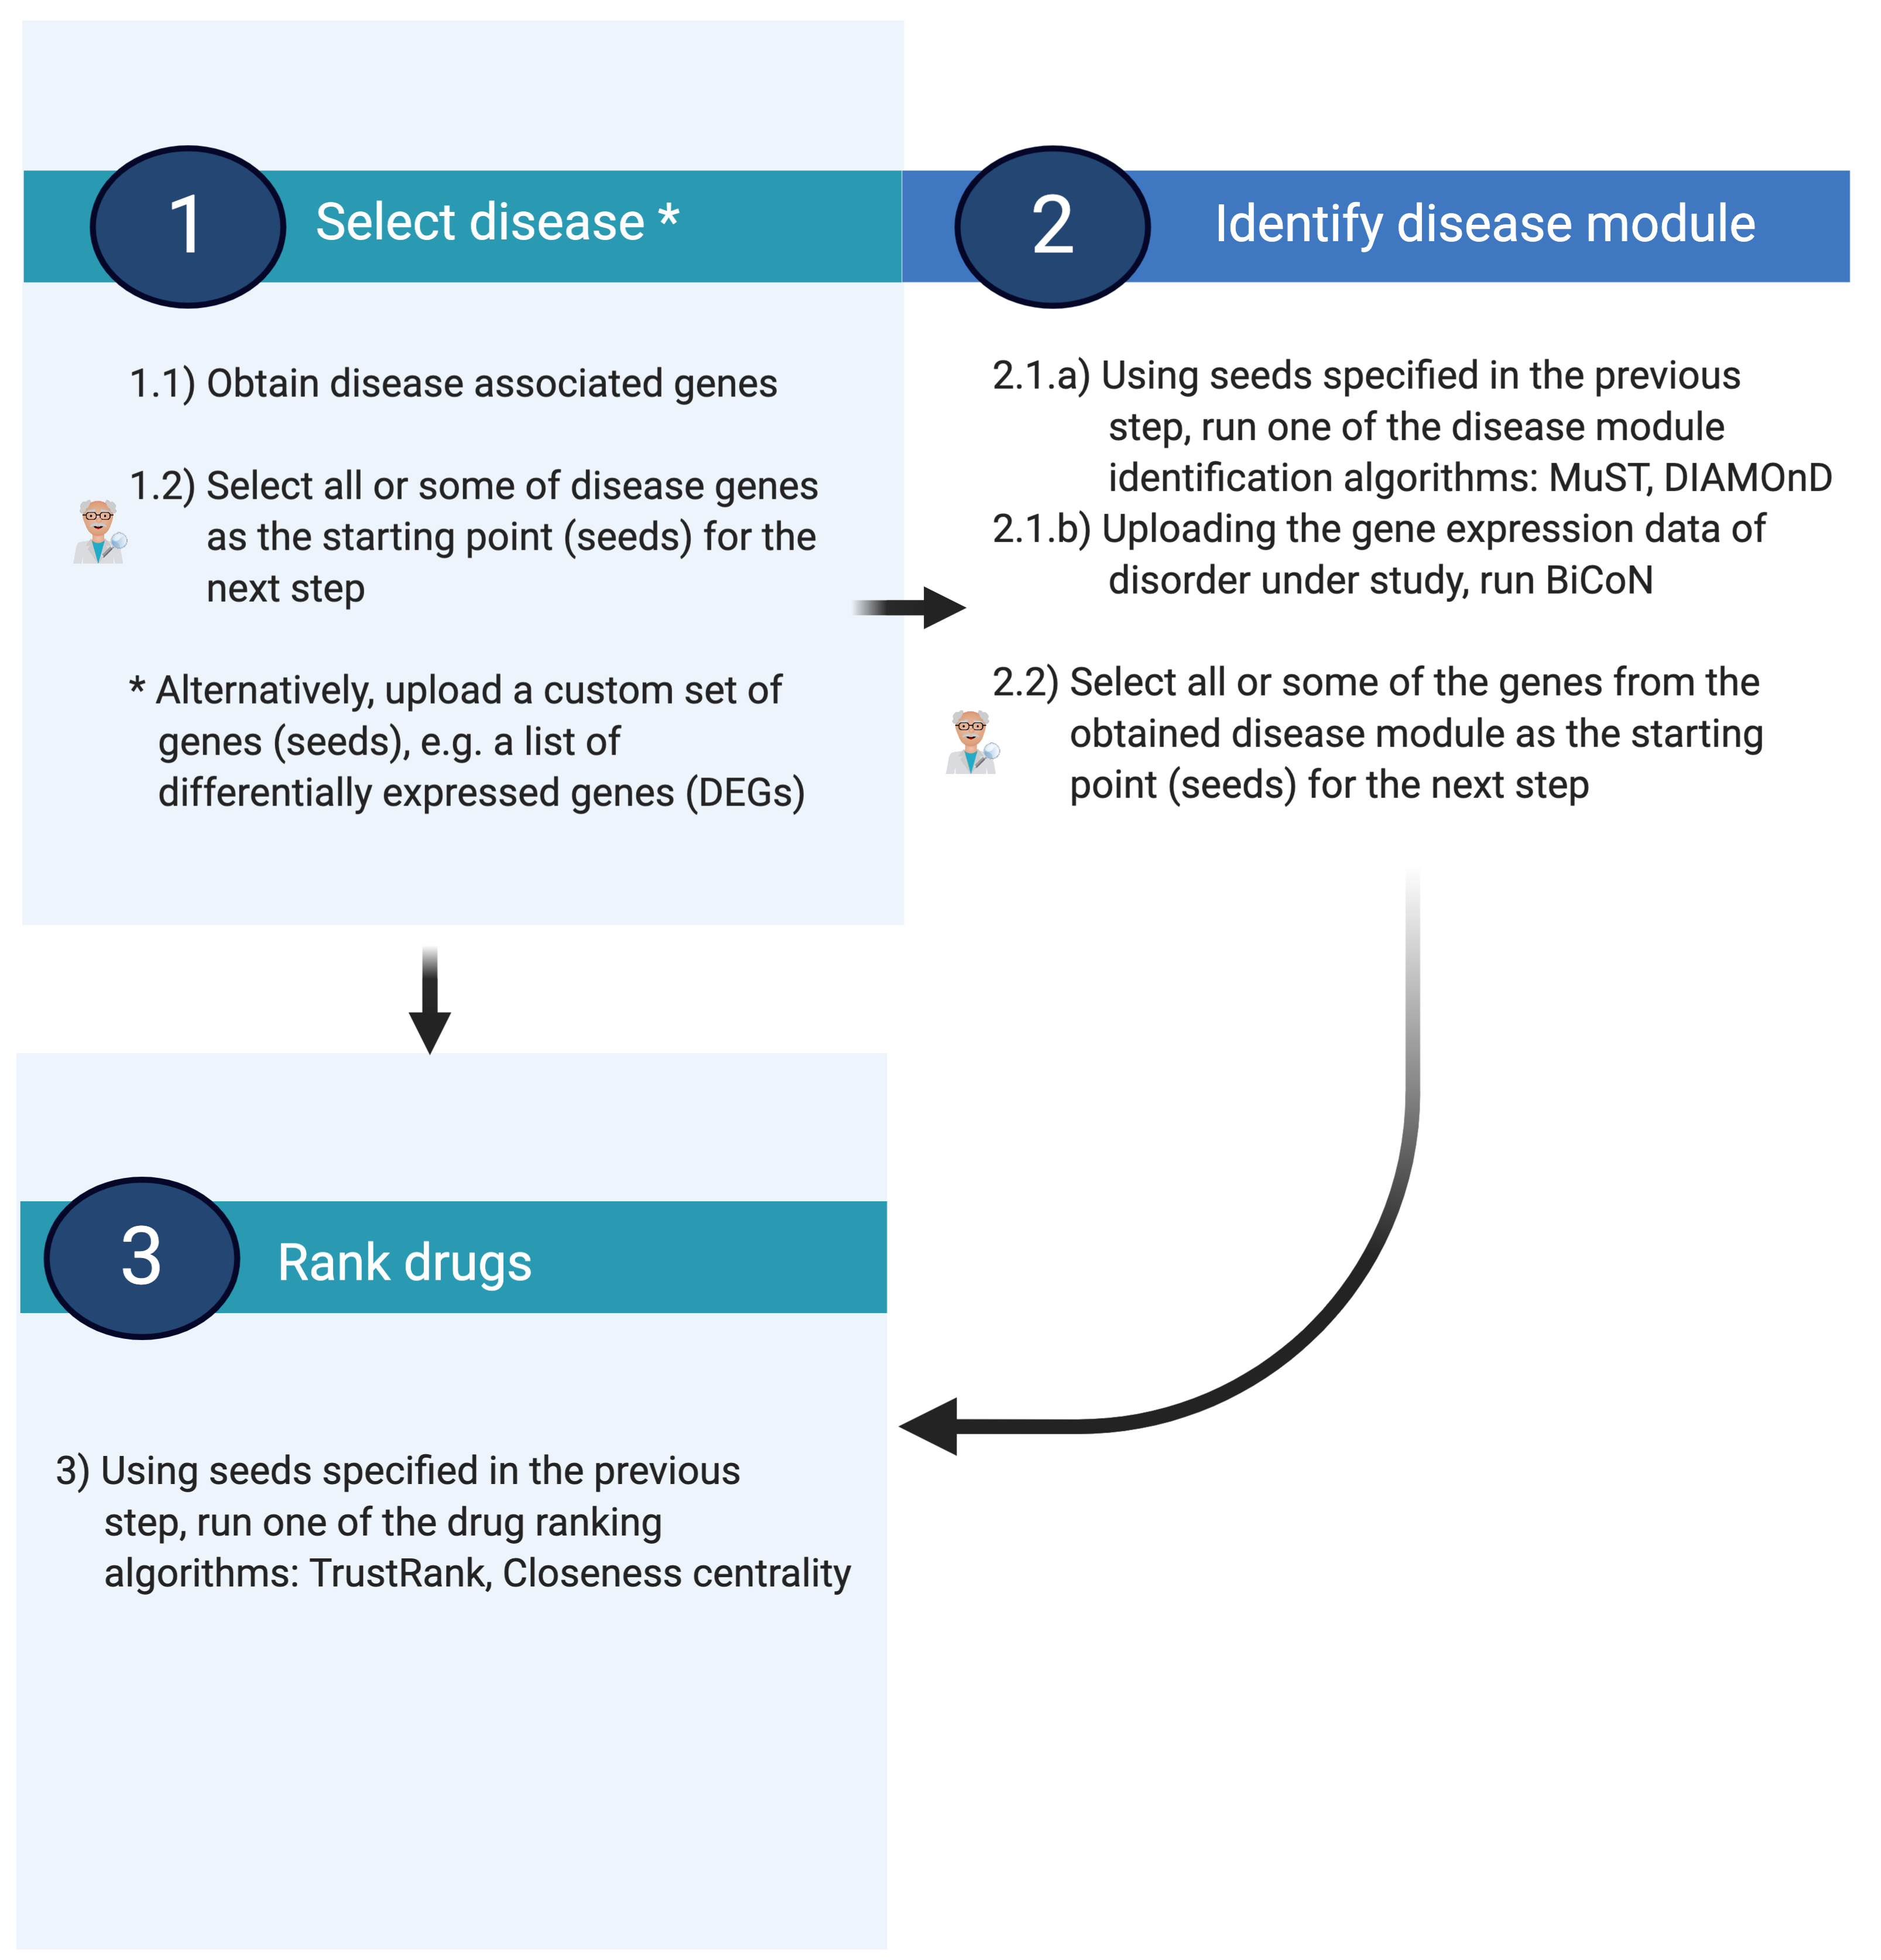
Step 1: Select disease and associated genes
The workflow can start either with:
selecting the disorder(s) under study and subsequently obtaining genes associated with them or
uploading a custom set of genes, e.g. DEGs
Option 1
A convenient way for selecting disorders is the Quick Select function (Apps –> NeDRex). Choose Disorder
as node type and type in the disease of interest. The box will suggest you all the disorder nodes in the network that
match your query. You can also search by the MONDO ID of the disease of interest.
Now you need to first add the disease(s) to your selection list by clicking on Add, when you are done with adding disorders to the list,
by clicking on Select in Graph, the nodes will be selected in the current network.
You can now obtain the associated genes by using the function Get Disease Genes. A subnetwork containing your selected disorders and their associated genes will automatically be created.
From the returned subnetwork, you can select either all the genes as seeds for next step or apply your expert knowledge and select
some of them. You can do the selection e.g. via Quick Select or simply use
Select nodes –> All nodes of specific type and choose Gene.
Option 2
You can upload a custom set of genes via the function Select Nodes –> From File to be used as seeds
for the next step. If you have a file containing HGNC symbols, check the box Select nodes with exact matching name and choose the
column displayName. If you have a file containing Entrez gene IDs, uncheck the box and choose the column name.
Step 2: Identify disease module
Disease modules are derived using seeds selected in the previous step as input and employing the MuST or DIAMOnD algorithm. Alternatively, the BiCoN algorithm can be employed to return disease modules. In this case, the previous step is skipped and gene expression data should be used as input for this step.
All of the functions in this category are available under the Disease Module Identification menu in the App.
Multi-Steiner Trees (MuST)
Having the seeds selected in the network, choose Disease Module Identification –> Run MuST.
Normally the solution of Steiner tree for the same set of genes (seeds) is not unique, therefore, it’s recommended to choose
Return multiple Steiner trees option to get aggregation of several results. Please notice the higher number you select for
The number of Steiner trees and Max number of iterations the longer the computation will take.
This function returns a new network containing all trees found by MuST, including the starting seeds and the connector nodes.
For more detailed info about the function and parameters see Run MuST and for detailed info on the MuST algorithm please see the methods section MuST.
DIAMOnD
Having the seeds selected in the network, choose Disease Module Identification –> Run DIAMOnD. The number of iteration
determines the size of the result subnetwork. It’s recommended to select a value between 20-200.
This function returns a new network containing the starting seeds and the genes found by DIAMOnD.
For more detailed info about the function and parameters see Run DIAMOnD and for detailed info on the DIAMOnD algorithm please see the methods section DIAMOnD.
BiCoN
To run BiCoN, you do not need to import any network from NeDRexDB beforehand, no seed selection is required and step 1 is skipped. You only need a file containing gene expression, methylation or any other numerical data for patients. You need to provide the following format as a tabular file (.csv, .tsv, or .txt) when running BiCoN.
GeneID |
Patient 1 |
Patient 2 |
Patient 3 |
Patient 4 |
|---|---|---|---|---|
6311 |
7.3487 |
6.9464 |
7.2675 |
6.8363 |
133584 |
6.5562 |
5.7931 |
6.3360 |
5.6389 |
283165 |
3.8878 |
3.9588 |
4.0173 |
4.0923 |
Having the input file ready, choose Disease Module Identification –> Run BiCoN.
BiCoN returns a connected subnetwork of genes which is the union of two identified gene clusters (red and blue). The resulting subnetwork is
colored with respect to its difference in expression patterns in patients clusters.
You can also find the patients grouping table and the biclustering heatmap in the Results Panel and download the image from there.
For more detailed info about the function and parameters see Run BiCoN and for detailed info on the BiCoN algorithm please see the methods section BiCoN.
Step 3: Rank drugs
Drug rankings are derived by employing the TrustRank or Closeness centrality algorithm on the obtained disease module from the previous step. You need to select all or some of the genes from the obtained module as the starting point (seed) for this step.
All of the functions in this category are available under the Drug Prioritization menu in the App.
TrustRank
Having the seeds selected in the network, choose Drug Prioritization –> Rank drugs with TrustRank. You need to specify
The number of top-ranked drugs you want to be returned in the result network. It’s recommended to select a value below 200.
This function returns a network containing your seeds and the top-ranked drugs directly or indirectly targeting them. All drugs have a score and rank assigned by the method.
For more detailed info about the function and parameters see Rank drugs with TrustRank and for detailed info on the TrustRank algorithm please see the methods section TrustRank.
Closeness Centrality
Having the seeds selected in the network, choose Drug Prioritization –> Rank drugs with Closeness Centrality. You need to specify
The number of top-ranked drugs you want to be returned in the result network. It’s recommended to select a value below 200.
This function returns a network containing your seeds and the top-ranked drugs directly or indirectly targeting them. All drugs have a score and rank assigned by the method.
For more detailed info about the function and parameters see Rank drugs with Closeness Centrality and for detailed info on the TrustRank algorithm please see the methods section Closeness centrality.